Creating a schedule for distribution
RC-Reporter supports automated email distribution of any report as a hyperlink or PDF to a user-defined recipient list. A distribution schedule allows for the automatic generation and distribution of reports via email occurring at set intervals, such as once per day, week, or month.
Use the following steps to create a report distribution schedule for a set interval:
- Click Admin > Distribution Schedules.
- On the Manage Distribution Schedules page, click Add Schedule.
- In the new row at the bottom of the grid, complete the following columns:
-
Schedule — Click the default interval Every 1 Days(s) at 12:00PM to open the Set Interval dialog box. Click DAYS to open the list of available intervals and click DAYS, WEEKS or MONTHS to select the interval and complete the remaining options in the Set Interval dialog box.
- Reports — Click the Add
 icon under Reports and select one or more reports listed on the Add New Report page. Click OK at the bottom of the page to add the reports to the schedule.
 -
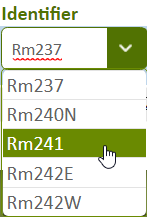
Identifier — If an Identifier Selector is included in a report as a result of using a Data Set in a component, the Identifier column shows an identifier. You can specify that the distributed report be generated for a specific identifier by clicking the item and selecting the identifier in the list.
- Recipients — Click the Add icon to add email recipients. The Report Recipients dialog box appears. Select one or more names and click OK.
- PDF — Select to send recipients a PDF version of the reports.
- Link — Select to send recipients a link to the online version of the report. Online reports provide additional interactive features. To view online reports, users must have an account in RC-Reporter with appropriate permissions, and must sign in with their user name and password.
- Subject & Message — Click to display the Email Subject and Message dialog, where you can enter text for the subject line of the outgoing email in the Subject box, and the body of the outgoing email in the Message box.
- Status — Toggle between Enabled and Disabled for report distribution by clicking the text in the Status column. You can also click Batch Actions > Enable or Batch Actions > Disable.
The Last Sent column shows the last date and time that the distribution schedule is sent. If incorrect user email credentials or server connection problems cause a Scheduled Distribution to fail, the entry in the Last Sent column is shown in red. When you hover over the red text, a message advises you to verify all of the SMTP settings on the Site Settings page. If a problem occurs during the generation of the PDF file, the message advises you to contact your local dealer.
The Next Send column indicates the next date and time that the distribution schedule will be sent. A dash ( - ) in the column indicates that the distribution schedule is not configured correctly and cannot be sent.
Note: You can generate a test email to view a scheduled report before it is sent automatically as part of a distribution schedule. To send a test email for a scheduled report, select the schedule in the left column, then click Batch Actions > Send Test Email. A list of report recipients appears. Select one or more recipients for the test email, and click OK.
© 2019 Reliable Controls Corporation. All rights reserved. Published October 29, 2019
More details