Importing spreadsheet data
In addition to the RC-Archive SQL databases, spreadsheet data can be uploaded to the RC-Reporter server as an External File. The points within the file can be used in reports. RC-Reporter supports two types of external files:
- Microsoft's Excel file format (.xlsx)
- Comma-Separated Value (.csv)
Note: Excel and CSV files with column names containing the tilde character ( ~ ) or the double quote character ( " ) are not supported by RC-Reporter. In addition, a column name cell that is blank is not supported.
You must use the following specific date/time format in a Microsoft Excel spreadsheet:
yyyy-mm-dd hh:mm:ss
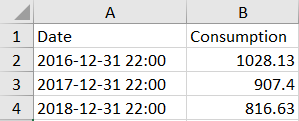
Figure: Example format for the Date column in Microsoft Excel
You must use the following specific date/time format in a comma separated value (.csv) file:
mm/dd/yyyy hh:mm
The following excerpt shows an example of a properly formatted CSV file:
Date,Temp1,Temp2,Humidity
12/10/2018 00:00,22.5,23.6,56
12/10/2018 00:10,22.4,23.8,54
12/10/2018 00:20,22.1,22.9,55
When using the CSV file format, ensure the following rules are met:
- No blank lines.
- First line is always a header row. Each column should have a header title that describes the column.
- Remaining lines should contain data.
- Each row after the second row should have the same format as the previous row.
Use the following steps to upload a spreadsheet file:
- Click Data > External Files to open the Manage External Files page.
- Click Upload and navigate to the file location.
- Select the file and click Open, or double-click the file. A page displays where you can specify which columns to import, and the parameters associated with the imported data.
-
In the Include as row, for each column in the spreadsheet, choose an option to import the data in the column by clicking the drop-down arrow.
- Append to point — Import the data as an addition to an existing point.
- New point — Import the data in the column as a new point (this is the default).
- Not used — Do not import the data in the column.
The Timestamp drop-down list box has been deprecated and is no longer enabled.
- In the Name row for each column, keep the name specified in the external file or enter a name for the point.
- In the Unit row for each column, designate the units to use for each point.
-
Click Save.
The points derived from the file are added to the list of files in the grid. The grid contains the following columns:
- File — The name of the file that the points were derived from.
- Points — The names of the points in the file.
- Uploaded — The date on which the file was uploaded.
- Uploader — The name of the RC-Reporter user who uploaded the file.
© 2019 Reliable Controls Corporation. All rights reserved. Published October 29, 2019